- Cisco Community
- Technology and Support
- Security
- Network Access Control
- Cisco ISE guest portal and enterprice wifi issue
- Subscribe to RSS Feed
- Mark Topic as New
- Mark Topic as Read
- Float this Topic for Current User
- Bookmark
- Subscribe
- Mute
- Printer Friendly Page
Cisco ISE guest portal and enterprice wifi issue
- Mark as New
- Bookmark
- Subscribe
- Mute
- Subscribe to RSS Feed
- Permalink
- Report Inappropriate Content
05-13-2014 11:08 AM - edited 03-10-2019 09:42 PM
Hi dears,
I configure Guest portal and PEAP authentication for local wifi users. When I connect guest ssid it is working normal.The guest portal page open and i do self-registration and access internet.
But when i want to connect enterprice wifi from pc, the pc is connected this ssid but when i want to access internet it open me the guest portal page.
when i disable the guest authorization profile i can connect the enterprice wifi. and access internet normally.
why enterprice wifi used guest portal authorization profile? is it have any sequence rule for guest and enterprice wifi authorization profile??
- Labels:
-
AAA
- Mark as New
- Bookmark
- Subscribe
- Mute
- Subscribe to RSS Feed
- Permalink
- Report Inappropriate Content
05-15-2014 08:11 PM
Hi teymur77777,
You can use Airespace:Airespace-Wlan-Id attrubute in your authorisation policy with CWA to explicitly match only Guest WLAN.
- Mark as New
- Bookmark
- Subscribe
- Mute
- Subscribe to RSS Feed
- Permalink
- Report Inappropriate Content
05-16-2014 01:20 AM
Hi Alexeev,
How do i configure airspace? please provide me any config link or documentation.
Thanks.
- Mark as New
- Bookmark
- Subscribe
- Mute
- Subscribe to RSS Feed
- Permalink
- Report Inappropriate Content
05-20-2014 07:01 AM
- Mark as New
- Bookmark
- Subscribe
- Mute
- Subscribe to RSS Feed
- Permalink
- Report Inappropriate Content
05-20-2014 03:53 AM
Authorization Policies
The ultimate goal of an Authentication Policy is to determine if the identity credential is valid or not. However, success or failure in the authentication policy may not necessarily determine whether the user or device is actually permitted access to the network. The authorization rules make that determination.
Goals of Authorization Policies
Authorization Policies have one main goal: to examine conditions in order to send an authorization result to the network access device (NAD). What conditions? Well, what did you have in mind?
Common conditions could include internal and external attributes, like Active Directory group membership or internal group membership within ISE. Policies can be built using attributes like location, time, if a device was registered, whether a mobile device has been jail-broken, nearly any attribute imaginable. Even the authentication is an attribute: was authentication successful; which authentication protocol was used; and what is the content of specific fields of the certificate that was used?
The policy compares these conditions with the explicit goal of providing an authorization result. The result may be a standard RADIUS access-accept or access-reject message, but it can also include more advanced items, like VLAN assignment, downloadable Access-Lists (dACL), Security Group Tag, URL redirection, and more.
The result allows or denies access to the network, and when it is allowed, it can include any and all restrictions for limiting network access for the user or endpoint.
Understanding Authorization Policies
Now that you understand the fundamental responsibilities of the Authorization Policy, it will be easier to understand the exercises in this section. To understand Authorization Policies even more, let’s examine a few.
Basic Authorization Policy rules are logically organized in this manner:
- IF conditions THEN AssignThesePermissions
Just like the Authentication Policy, Authorization Policy rules are processed in a top-down, first-match order. So, if the conditions do not match, the authentication is compared to the next rule in the policy.
ISE is preconfigured with a default rule for blacklisted devices, named Wireless Blacklist Default, Profiled Cisco IP-Phones, and Profiled Non Cisco IP-Phones. Let’s examine the Cisco IP-Phone and blacklist rules in order to dig into authorization rules and how they work. If you have a live ISE system, it may help to follow along with the text.
From the ISE GUI, perform the following steps:
- Navigate to Policy > Authorization.
You should notice an immediate difference between the Authorization Policy and the Authentication Policy examined earlier in this chapter. The Authorization Policy attempts to display the rule logic in plain English. The bold text designates an identity group, while the standard font is a normal attribute. The operator is always AND when both identity group and other conditions are used in the same rule.
Figure 13-18 displays the default Authorization Policy.
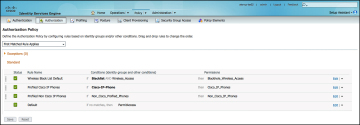
Figure 13-18.Default Authorization Policy
- Edit the rule named Cisco IP-Phones.
Notice the identity group is a separate list than the other conditions. In this rule, there is an identity group named Cisco-IP-Phones. The next field is where other conditions are selected.
This particular rule is a prebuilt rule that permits any device that was profiled as a Cisco IP-Phone, sending an access-accept that also sends an attribute value pair (AVP) that permits the phone into the voice VLAN. Figure 13-19 shows an identity group of Cisco-IP-Phone.
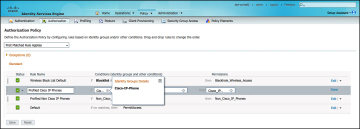
Figure 13-19.Profiled Cisco IP Phones
- Examine the permissions (result) that is sent. Navigate to Policy > Policy Elements > Results > Authorization > Authorization Profiles.
Authorization Profiles are a set of authorization results that should be sent together. Notice that there are two other categories of authorization results: Downloadable ACLs and Inline Posture Node Profiles.
Figure 13-20 displays the default Authorization Profiles.
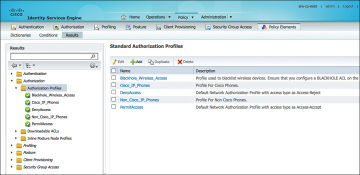
Figure 13-20.Default Authorization Profiles
- Select the Cisco_IP_Phones Authorization Profiles.
The authorization result needs to be RADIUS attributes. To make that easier for the users of ISE, Cisco has included a Common Tasks section that presents the options in more of a “plain English” format. The Attributes Details section at the bottom displays the raw RADIUS result that is sent.
Figure 13-21 shows the common tasks, using the default Cisco_IP_Phones authorization profile as the example.
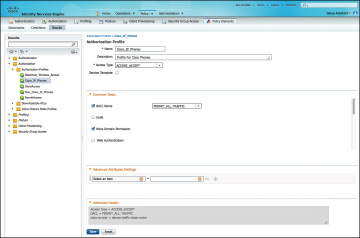
Figure 13-21.Cisco_IP_Phones Authorization Profile
In Figure 13-21, note the DACL name is a drop-down box where you select a downloadable access list that is created and stored in ISE. The Voice Domain Permission check box is required for the switch to allow the phone into the voice VLAN on the switch.
- Notice in the Attributes Detail section, this authorization result sends a RADIUS result with an access-accept, a dACL that permits all traffic, and the voice-domain VSA to permit the phone to join the voice VLAN.
Next, examine the Wireless Blacklist Default Rule:
- Navigate to Policy > Authorization.
- Edit the rule named Wireless Black List Default.
Notice the Identity Group is a separate list than the other conditions. In this rule, there is an Identity Group named “Blacklist”. The next field is populated with a pre-built condition specifying wireless connections. This particular rule is built to prevent devices that have been marked lost or stolen from accessing the network.
- Examine the authorization condition being used. Navigate to Policy > Policy Elements > Conditions > Authorization > Compound Conditions.
Figure 13-22 shows the default list of compound conditions.
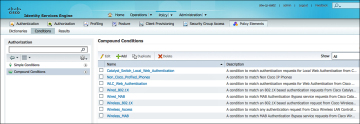
Figure 13-22.Pre-Built Authorization Compound Conditions
- Select Wireless_Access.
As shown in Figure 13-23, the Wireless_Access compound condition references the RADIUS attribute of NAS-Port-Type Equals Wireless – IEEE 802.11.1
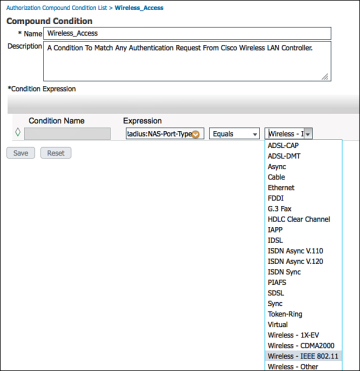
Figure 13-23.Wireless_Access Compound Condition
- Examine the authorization result that is being sent for this Authorization Rule. Navigate to Policy > Policy Elements > Results > Authorization > Authorization Profiles.
- Select Blackhole_Wireless_Access.
As shown in Figure 13-24, the Blackhole_Wireless_Access Authorization Profile does not use any of the common tasks. Instead, it employs the Advanced Attribute settings to send a URL-Redirect and URL-Redirect-ACL result to the WLC, along with an access-accept. So, this result allows the devices onto the network, but forces all traffic to redirect to a web page describing that the device was blacklisted.

Figure 13-24.Blackhole_Wireless_Access Authorization Profile
These two authorization rules demonstrate a variety of rules. This chapter examines a few common Authorization Policies in later sections.
Role-Specific Authorization Rules
The end goal of a Secure Access deployment is to provide very specific permissions to any authorization. In Chapter 6, “Building a Cisco ISE Network Access Security Policy,” you learned all about the specific results and how to create those authorizations. However, that should always be handled in a staged approach in order to limit the impact to the end users.
Part V is dedicated to this phased approach.
Authorization Policy Example
This section provides an example of an Authorization Policy made up of numerous rules based on a common use case. This use case was selected to show multiple aspects of the Authorization Policy and help to solidify your working knowledge the parts/pieces of an Authorization Policy and the workflows associated with creating the policies.
For this example, let’s configure three authorization rules: one that assigns full access to an employee that authenticated successfully with EAP chaining followed by a rule that assigns more limited access to the same employee authenticating with a non-corporate machine. The last rule created assigns Internet-only access to the same employee authenticating on a mobile device.
Employee and Corporate Machine Full-Access Rule
In this rule, assign full-access permissions to an employee that is authenticating from a valid corporate asset. From the ISE GUI, perform the following steps:
- Navigate to Policy > Authorization.
- Insert a new rule above the default rule.
- Name the new rule Employee and CorpMachine.
- For the other conditions drop-down, where it says Select Attribute, click the + and select Create New Condition.
- Choose Network Access > EapChainingResult.
- Choose Equals.
- Select User and Machine Both Succeeded.
- Click the cog on the right-hand side > Add Attribute/Value.
- Select AD1 > External Groups Equals “Employees” (or another AD group of your choosing).
- For the AuthZ Profiles, click the + sign.
- Click the cog in the upper-right corner > Add New Standard Profile.
- Name the new Authorization Profile Employee Full Access.
- Optionally add a description.
- Access Type = Access_Accept.
- Select DACL Name > Permit_ALL_TRAFFIC.
Figure 13-25 shows the Employee Full Access authorization profile.
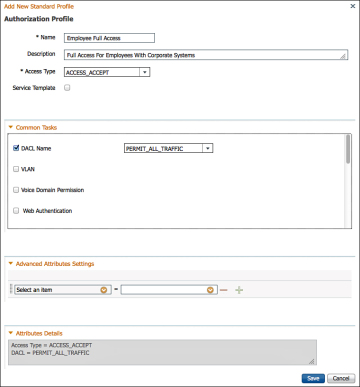
Figure 13-25.Employee Full Access Authorization Profile
- Click Save.
- Click Done to finish editing the rule.
- Click Save to save the Authorization Policy.
Figure 13-26 shows the completed authorization rule.
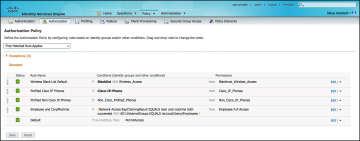
Figure 13-26.Completed Employee and CorpMachine Rule
Internet Only for iDevices
Now that the rule for employees with corporate devices has been created, you need to create the rule below it that provides Internet access only to employee authentications on mobile devices.
To begin this rule, first create a new DACL that is applied to switches, create the authorization result, and then go back into the Authorization Policy and build the rule:
- Navigate to Policy > Policy Elements > Results > Authorization > Downloadable ACLs.
- Click Add.
- Name the ACL Internet Only.
- Optionally provide a description.
- Within DACL Content, provide an ACL that permits required traffic for Internet access and denies traffic destined to the corporate network.
Figure 13-27 is just an example.
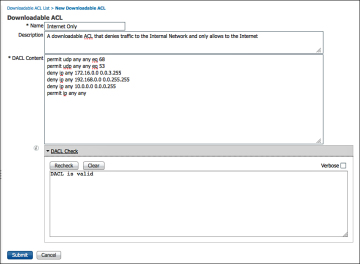
Figure 13-27.Internet Only DACL
- Click Submit.
Now that the DACL is created, it’s time to create the Authorization Profile:
- Navigate to Policy > Policy Elements > Results > Authorization > Authorization Profiles.
- Click Add.
- Name the Authorization Profile Internet Only.
- Optionally provide a description.
- Access Type is ACCESS_ACCEPT.
- Select DACL Name and select Internet Only.
- Optionally provide a GUEST VLAN.
Keep in mind this VLAN Name or ID is used for both wired and wireless devices. An alternative is to create separate rules for wired and wireless, so the user is assigned VLAN on wireless, but not wired.
- Select Airspace ACL Name and fill in the name of the ACL on the controller that provides Internet Only Access.
- Click Submit.
Figure 13-28 shows the completed Authorization Profile.
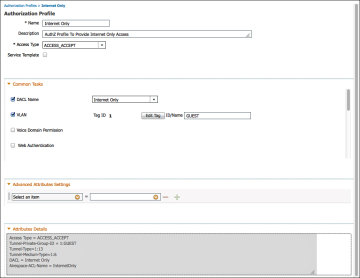
Figure 13-28.Internet Only Authorization Profile
Before you build the Authorization Policy, create a logical profiling policy that encompasses all mobile devices. This makes the policy building much easier and provides a reusable policy object:
- Navigate to Policy > Profiling > Logical Profiles.
- Click Add.
- Name the Logical Policy iDevices.
- Optionally provide a description.
- Select all the mobile platforms from the Available Devices side, and click the > to move them to the Assigned Policies side.
- Click Submit.
Figure 13-29 shows the iDevices Logical Profile.
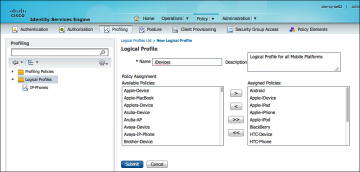
Figure 13-29.iDevices Logical Profile
Finally, it is now time to create the authorization rule:
- Navigate to Policy > Authorization.
- Insert a new rule above the default rule.
- Name the Rule Employee iDevices.
- Select the + sign for conditions, and select Endpoints > LogicalProfile.
- Choose Equals.
- Select iDevices.
- Click the cog on the right-hand side > Add Attribute/Value.
- Select AD1 > External Groups Equals “Employees” (or another AD group of your choosing).
- For the AuthZ Profiles, click the + sign.
- Select Standard > Internet Only.
- Click Done.
- Click Save.
The completed authorization rule is displayed in Figure 13-30.
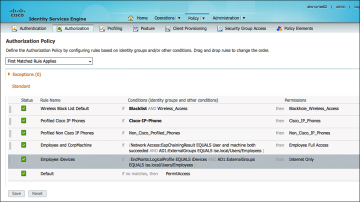
Figure 13-30.Employee iDevices Authorization Rule
Employee Limited Access Rule
Now the rule for employees connecting with mobile devices is created, you need to create the rule below it that provides limited access only to employee authentications on any other device.
To begin this rule, first create a new DACL that is applied to switches, create the authorization result, and then go back into the Authorization Policy and build the rule:
- Navigate to Policy > Policy Elements > Results > Authorization > Downloadable ACLs.
- Click Add.
- Name the ACL Employee Limited.
- Optionally provide a description.
- Within DACL Content, provide an ACL that permits required traffic and denies traffic destined to the corporate network. For this example, allow traffic to reach our virtual desktop infrastructure and essential services, like DNS only.
Figure 13-31 shows the Employee Limited dACL.
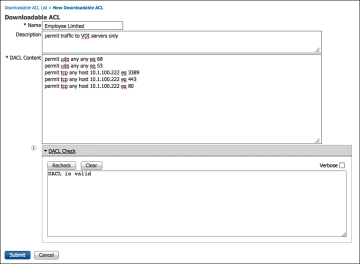
Figure 13-31.Employee Limited DACL
- Click Submit.
Now that the DACL is created, build the Authorization Policy to permit network access and apply that DACL:
- Navigate to Policy > Policy Elements > Results > Authorization > Authorization Profiles.
- Click Add.
- Name the Authorization Profile Employee Limited.
- Optionally provide a description.
- Access Type is ACCESS_ACCEPT.
- Select DACL Name and select Employee Limited.
- Do not assign a different VLAN for this authorization.
- Select Airspace ACL Name and fill in the name of the ACL on the controller that provides Internet-only access.
- Click Submit.
Figure 13-32 shows the completed Authorization Profile.
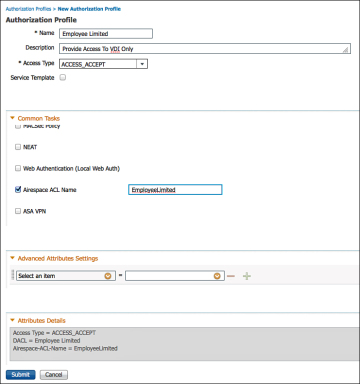
Figure 13-32.Employee Limited Authorization Profile
Now, create the Authorization Policy rule to assign that Authorization Profile:
- Navigate to Policy > Authorization.
- Insert a new rule above the default rule.
- Name the Rule Employee Limited.
- Select the + sign for conditions.
- Select AD1 > External Groups Equals “Employees” (or another AD group of your choosing).
- For the AuthZ Profiles, click the + sign.
- Select Standard > Employee Limited.
- Click Done.
- Click Save.
Figure 13-33 shows the completed Employee Limited authorization rule.
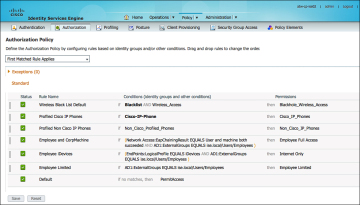
Figure 13-33.Employee Limited Authorization Rule
- Mark as New
- Bookmark
- Subscribe
- Mute
- Subscribe to RSS Feed
- Permalink
- Report Inappropriate Content
06-01-2014 11:30 PM
- Mark as New
- Bookmark
- Subscribe
- Mute
- Subscribe to RSS Feed
- Permalink
- Report Inappropriate Content
06-02-2014 02:36 AM
yes you need to recheck your guest policy and from log you can easily find which policy is making the issue.and its better that you disable all your wireless policy and create a fresh policy so that your original configuration is not effected.
**************Do rate helpful posts*************************
- Mark as New
- Bookmark
- Subscribe
- Mute
- Subscribe to RSS Feed
- Permalink
- Report Inappropriate Content
06-02-2014 02:39 AM
As you see in attached file i have 2 authorization policy now. Must i create new authorization policy and config here airespace conditions? or i can do modify in current guest cwa policy conditions?
Thanks.
- Mark as New
- Bookmark
- Subscribe
- Mute
- Subscribe to RSS Feed
- Permalink
- Report Inappropriate Content
06-02-2014 02:40 AM
2 authorization policy for guest portal.
Discover and save your favorite ideas. Come back to expert answers, step-by-step guides, recent topics, and more.
New here? Get started with these tips. How to use Community New member guide