- Cisco Community
- Technology and Support
- Collaboration
- Collaboration Applications
- Hi Mohamed, Yes, you do need
- Subscribe to RSS Feed
- Mark Topic as New
- Mark Topic as Read
- Float this Topic for Current User
- Bookmark
- Subscribe
- Mute
- Printer Friendly Page
CWMS upgrade from 1.5 to 2.0 error
- Mark as New
- Bookmark
- Subscribe
- Mute
- Subscribe to RSS Feed
- Permalink
- Report Inappropriate Content
04-27-2014 07:07 PM - edited 03-17-2019 04:07 PM
Hi All UC Experts,
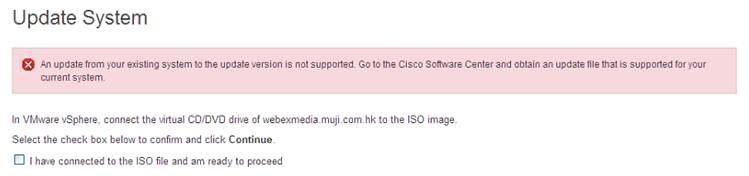
I installed the CWMS version 1.5, which is using on the production and I want to upgrade to the 2.0 version, that is supporting the android platform. Then I downloaded the 2.0 upgrade iso (http://software.cisco.com/download/release.html?mdfid=284751302&catid=282627892&softwareid=284536950&release=2.0(1)&relind=AVAILABLE&rellifecycle=&reltype=latest) and mounted the iso to press the upgrade button.
Unfortunately, I got the error "An upgrade from your existing system to the upgrade version is not supported. Go to the Cisco Software Center and obtain an upgrade file that is supported for your current system."
Any idea for that?
Is it the hw requirments fail to the upgrade? I had used the version 1.5 ova to deploy the vm hw template. I checked the 2.0 upgrade requirement, that should be avaiable the hd as 1.5TB “Cisco WebEx Meetings Server Release 2.0, the ESXi hosts (Cisco UCS server) with the Admin virtual machine require 1.5 TB of disk space. The ESXi hosts (Cisco UCS server) without an Admin virtual machine require 1 TB of disk space. When you are upgrading to Cisco WebEx Meetings Server Release 2.0 from Release 1.x using your existing Cisco UCS servers, the ESXi hosts will need 1118 GB of free disk space.”
- Labels:
-
Webex Meetings
- Mark as New
- Bookmark
- Subscribe
- Mute
- Subscribe to RSS Feed
- Permalink
- Report Inappropriate Content
04-27-2014 08:29 PM
Hi Edwin,
Upgrading from CWMS 1.5 to 2.0 is considered a MAJOR upgrade. You cannot use CWMS 2.0 Maintenance Release 2 ISO image to upgrade from CWMS 1.5. To upgrade, you need order CWMS 2.0 installation media (OVA file) using Product Upgrade Tool. You can find information about ordering the OVA here: https://supportforums.cisco.com/document/12110101/ordering-cwms-20-migration-file-through-product-upgrade-tool
Once you get the OVA file, you can then follow these instructions for upgrading (Major Upgrade): http://www.cisco.com/c/en/us/td/docs/collaboration/CWMS/2_0/Administration_Guide/Administration_Guide_chapter_01001.html.
You will see you have two options for the upgrade: Automatic or Manual. If you choose Manual upgrade, keep in mind that you need to fulfill Disk Space requirements specified in the Upgrade Guide.
If you choose Automatic option, please, ensure to review the Upgrade Guide provided above, and then also review the following tips for Automatic Upgrade:
1. Make sure your UCS servers currently fulfil HDD space requirements mentioned in the documentation:
When you are upgrading to Cisco WebEx Meetings Server Release 2.0 from Release 1.x using your existing Cisco UCS servers,
A. The ESXi hosts will need 1118 GB of free disk space if the UCS server has only the Admin virtual machine (primary or HA system) (50 user system) or
B. 990 GB of free disk space if the UCS server has one Admin and one Media virtual machine (primary or HA system) (250, 800, 2000 user systems).
To check this, do the following:
a. Use vSphere client to connect to vCenter.
b. Click on ESXi host that hosts the primary Admin and Media VM.
c. Click on Configuration tab.
d. Under Hardware section, click on Storage.
e. In the details section, take a look how much free space (under Free column) you have on the storage assigned to this ESXI host.
2. Ensure all the ESXi hosts in your deployment have NTP configured to “Start and Stop with host”, that NTP is started, and that time is in sync on all hosts. If not, and if you need to make adjustments to time, this has to be done when all the VMs are gracefully shut down, as DB data is very dependent on time stamps.
To check this do the following:
a. Use vSphere client to connect to vCenter.
b. Click on ESXi host.
c. Click on Configuration tab
d. Click on Time Configuration link in the Software section
e. Click on Properties in the top right
f. Verify the time and that NTP Client is Enabled – if time is incorrect. Don’t adjust it why your VMs are running. Find the time to put the system into Maintenance, gracefully power them off (Power > Shut down Guest), and then adjust the time.
g. If the time is OK, click on Options button
h. Ensure Start and Stop with Host is selected. If the time is correct, but this setting is wrong, you can make the change without powering off the VMs.
i. Repeat this on all ESXi hosts in your CWMS deployment.
3. When dedicating a temporary IP address and hostname to the CWMS 2.0 Admin upgrade VM (per documentation), ensure that your firewall between the IRP server and internal network applies all the needed rules to this temporary IP address and hostname as well. So all the rules that apply to the currently running Admin VM IP address and hostname, should be applied to the temporary IP address and hostname of the CWMS 2.0 Admin upgrade VM. Of course, this temp IP and hostname should be resolvable in DNS.
4. Ensure you are deploying CWMS 2.0 Admin upgrade VM on the same ESXi host that is running your existing Primary Admin VM
5. Ensure your vCenter is reachable via hostname and not only via IP address. If you run a vSphere client, in the IP Address / Name of the server, enter the FQDN of the vCenter server and ensure that is resolvable in your network and that you can actually connect to it. This is important for Step 5 of the upgrade instructions where you need to enter vCenter hostname and credentials for the Upgrade VM to connect to.
6. Use Standard vSwitch on your VMs instead of Distributed vSwitch.
To check this do the following:
a. Use vSphere client to connect to vCenter.
b. Click on ESXi host.
c. Click on Configuration tab
d. Click on Networking link in Hardware section
e. Click View: vSphere Standard Switch button. If you see your NICs configured here, it means you are using Standard vSwitch.
f. Still, click on View: vSphere Distributed Switch button, and ensure there is nothing configured there.
Finally, after you upgrade to 2.0, then you can use the ISO image provided on cisco.com to upgrade to the latest Maintenance Release.
I hope this will help.
-Dejan
- Mark as New
- Bookmark
- Subscribe
- Mute
- Subscribe to RSS Feed
- Permalink
- Report Inappropriate Content
04-30-2014 08:17 AM
I have a 250 user CWMS setup with Admin & Media on one UCS C220-M3 (four 500GB HDD configured Raid5) and IRP on second C220-M3. The Admin/Media server is showing 832 GB free. Does anyone know of a way to reduce file size (removing logs, etc.) to get to the required 990 GB free requirement for 2.0 upgrade?
- Mark as New
- Bookmark
- Subscribe
- Mute
- Subscribe to RSS Feed
- Permalink
- Report Inappropriate Content
04-30-2014 08:31 AM
Hi,
Do you have any VM snapshots taken on either Admin or Media VM? If you do, Delete them. That should free up a lot of disk space.
-Dejan
- Mark as New
- Bookmark
- Subscribe
- Mute
- Subscribe to RSS Feed
- Permalink
- Report Inappropriate Content
04-30-2014 08:39 AM
No snapshots on that server. I've also posted a question in Unified Computing forum about adding disk to Raid5. Not sure if that's possible without starting from scratch.
- Mark as New
- Bookmark
- Subscribe
- Mute
- Subscribe to RSS Feed
- Permalink
- Report Inappropriate Content
04-30-2014 09:26 AM
If there are no VM snapshots, then there is nothing you can delete from the system. There might be some logs that can be deleted, but for that you would need to reach out to TAC to create Remote Support Account and access the system via CLI.
As for adding a disk to RAID 5, I will have to let Software Virtualization team respond to that one. I don't think you would need to rebuild everything, and it should be possible to just add a drive. However, I am not familiar with the process.
-Dejan
- Mark as New
- Bookmark
- Subscribe
- Mute
- Subscribe to RSS Feed
- Permalink
- Report Inappropriate Content
04-30-2014 09:49 AM
Thanks for the replies. I will wait to hear from the UCS group and hopefully can move one HDD from the IRP to Admin/Media.
- Mark as New
- Bookmark
- Subscribe
- Mute
- Subscribe to RSS Feed
- Permalink
- Report Inappropriate Content
05-08-2014 08:53 PM
Hi,
According to the Cisco Upgrade Tool, I downloaded the Webex Meetings Server 2.0MR1 (cisco-webex-meetings-server-2.0.1.107.B-AE.ova), but it is fail for me to upgrade.
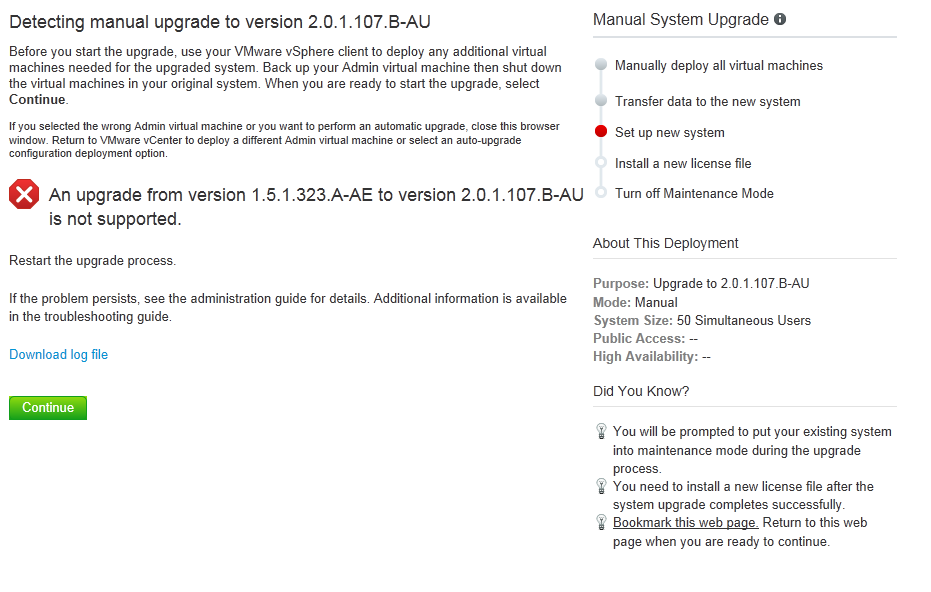
Otherwise, the delivered USB is write protected, that I cannot open it. What can I do? Thanks!
- Mark as New
- Bookmark
- Subscribe
- Mute
- Subscribe to RSS Feed
- Permalink
- Report Inappropriate Content
05-08-2014 09:10 PM
Hi Edwin,
You have 1.5.1.323.A-AE version installed, which supports Audio Encryption, and you are trying to upgrade with the 2.0.1.107.B-AU which doesn't support Audio Encryption. Please, try using 2.0.1.107.B-AE version of the software.
-Dejan
- Mark as New
- Bookmark
- Subscribe
- Mute
- Subscribe to RSS Feed
- Permalink
- Report Inappropriate Content
05-09-2014 11:03 PM
- Mark as New
- Bookmark
- Subscribe
- Mute
- Subscribe to RSS Feed
- Permalink
- Report Inappropriate Content
05-10-2014 04:04 PM
Hi Edwin,
It appears that your USB drive is corrupted. There is no way around it. I've seen that kind of an issue before. The only option is to order the media via PUT again. If for some reason you get a warning that you exceeded the eligibility for ordering "At least one of the quantities that you entered is greater than the 'Eligible Orderable Quantity'", email ucss-support@external.cisco.com for help on allowing you to order a new media. If needed, reach out to your Cisco Account Manager for assistance.
-Dejan
- Mark as New
- Bookmark
- Subscribe
- Mute
- Subscribe to RSS Feed
- Permalink
- Report Inappropriate Content
05-11-2014 05:17 PM
Hi Dejan,
Actually, I ordered 4 x USB. All USBs are the same write protect error. Another format on that? Cannot open on the Windows platform?
- Mark as New
- Bookmark
- Subscribe
- Mute
- Subscribe to RSS Feed
- Permalink
- Report Inappropriate Content
05-11-2014 07:48 PM
Hi Edwin,
The USB should be accessible on Windows platform as any other USB and you should be able to download the OVA image, a readme file, and the MD5SUM file. If all 4 USB drives are corrupted, and you are not able to order E-delivery to download the IMG file from PUT, please, reach out to your Cisco Account team to help you obtain the installation media. I will report this problem to Manufacturing to ensure this doesn't happen again. I am sorry for the inconvenience you are experiencing with this.
-Dejan
- Mark as New
- Bookmark
- Subscribe
- Mute
- Subscribe to RSS Feed
- Permalink
- Report Inappropriate Content
02-18-2015 02:51 AM
Hello
I have right now CWMS v1.5.1.6.A , can i upgrade to V2.5 or i have to upgrade to 1.5 MR3 before v2.5?. Please help
Thanks
- Mark as New
- Bookmark
- Subscribe
- Mute
- Subscribe to RSS Feed
- Permalink
- Report Inappropriate Content
02-18-2015 05:11 AM
Hi Mohamed,
Yes, you do need to update to 1.5 MR3 or later before you do a Major Upgrade to 2.5. For example you can update to 1.5 MR5 first by following these best practices:
- Download the 1.5 MR5 ISO from cisco.com: cisco-webex-meetings-server-1.5.1.503.A.iso
- Once downloaded, just verify the MD5SUM of the ISO file and compare it to the MD5SUM listed on cisco.com (MD5 Checksum: 21df6f0b1be67ee739ed0004885ff31d)
- Ensure on your Dashboard that the daily backup is completed successfully (if you don't have NFS storage you can skip this step)
- Upload the ISO file (cisco-webex-meetings-server-1.5.1.503.A.iso) to the Datastore that CWMS Admin VM has access to.
- On the CWMS Dashboard, put the system into Maintenance Mode.
- Gracefully power off the VMs (In vCenter for each VM select Power > Shut Down Guest).
- Once the machines are down, take the snapshot of each VM (in vCenter for each VM create a VM snapshot).
- After snapshots of CWMS VMs are taken, in vCenter, power ON all the VMs.
- The system will boot into Maintenance Mode.
- Mount the cisco-webex-meetings-server-1.5.1.503.A.iso image to the CD/DVD drive of the Admin VM.
- Initiate the update process (Go to Dashboard Admin page, click on the System tab > Upgrade > Update (minor update). Click Continue, and follow the wizard and let the update proceed).
- Once the update is completed, bring the system out of Maintenance Mode.
- Verify everything is up and running, verify the version on the Dashboard is updated, and test basic functions like accessing the end user page, schedule a test meeting and join it.
- After thorough testing and confirming everything is running as expected, proceed with removing the VM snapshots (in vCenter, for each VM ensure to remove the snapshots). This is a mandatory step as having snapshots on the system will cause serious performance degradation! Remove the snapshots within 24h after the update. No VM snapshots must be taken when upgrading to 2.5, so they must be removed once you verified all was good and before you proceeded with 2.5 upgrade.
I hope this helps.
-Dejan
Discover and save your favorite ideas. Come back to expert answers, step-by-step guides, recent topics, and more.
New here? Get started with these tips. How to use Community New member guide